

There’s something truly magical about dessert; it has the power to transport us back to cherished memories and create new ones in a single bite. Today, I’m excited to share with you a recipe that embodies that very essence: Pistachio Blackberry Cheesecake Towers. This isn’t merely a cheesecake; it’s a delightful symphony of flavors that intertwines the earthy richness of pistachios with the vibrant tartness of fresh blackberries. Each layer tells a story, making this dessert not just food, but an experience that you’ll want to savor and share with your loved ones.
As you embark on this culinary journey, imagine the aroma wafting through your kitchen as the buttery biscuit base bakes to golden perfection, filling your home with warmth and comfort. The creamy pistachio cheesecake layer, infused with rich flavors and adorned with luscious blackberry compote, creates a visual feast that’s simply irresistible. I promise you, these Pistachio Blackberry Cheesecake Towers are perfect for any occasion—from intimate gatherings to grand celebrations—because they bring joy and indulgence in every bite.
Pistachio Blackberry Cheesecake Towers: A Delightful Layered Indulgence
Let’s dive into this delightful recipe! The combination of textures and flavors in these cheesecake towers is sure to impress anyone who gets a taste. Imagine cutting through each layer: the crunchy biscuit base gives way to the creamy pistachio filling, all topped off with tangy blackberry compote and crowned with a silky mascarpone topping. Each component plays an important role in creating not just a dessert but an unforgettable experience.
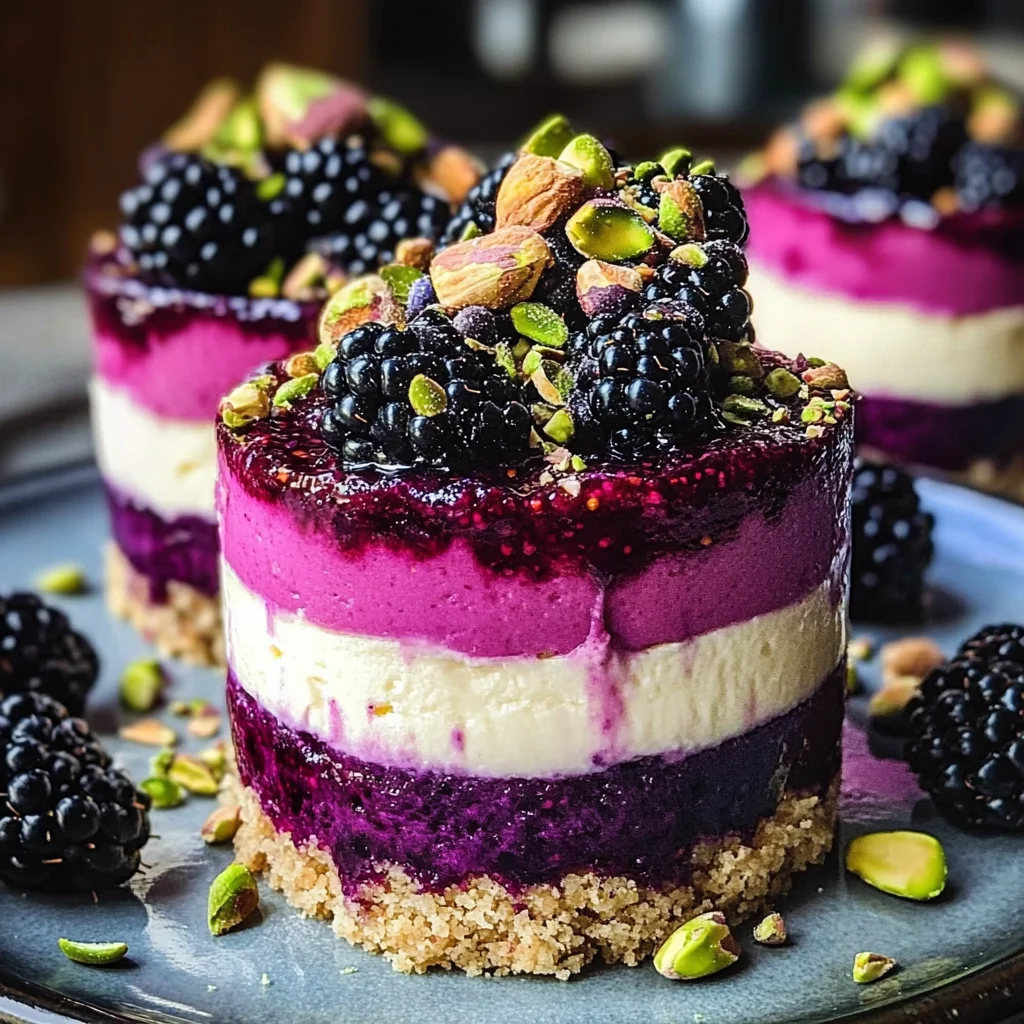
Ingredients:
Before we start whipping up these delicious towers, let’s take a moment to appreciate our ingredients. They’re not just simple components; they’re essential players in crafting this stunning dessert masterpiece.
- 1 cup digestive biscuits or graham crackers, crushed – The foundation of our cheesecake towers begins here! Digestive biscuits are wonderfully crisp and add a slightly sweet note that perfectly complements the rich layers above. If you opt for graham crackers, go for those that have a touch of honey for added flavor depth. Crush them into fine crumbs for an ideal base; this ensures even baking and creates that delightful crunch we all love!
- 6 tablespoons unsalted butter, melted – This liquid gold binds our biscuit crumbs together beautifully while adding richness and moisture. When melted butter meets the crushed biscuits, it creates a crumbly mixture that will firm up as it cools. Make sure you use unsalted butter here so you can control the sweetness of your cheesecake; after all, we want those sweet notes from the cream cheese and sugar to shine through!
- 2 tablespoons sugar – Sugar isn’t just for sweetness; it adds structure to our biscuit base too! It caramelizes slightly during baking, enhancing the overall flavor profile while achieving that perfect texture. Don’t skip this step—every bit counts toward building layers of deliciousness!
- 16 oz cream cheese, softened – This is the heart of our cheesecake layer! Cream cheese provides that smooth, creamy consistency we crave in cheesecakes. Soften it at room temperature before mixing; this critical step allows for easy blending without lumps—trust me, no one wants an uneven texture in their cheesecake!
- 1 cup pistachio paste – Ahh, pistachio paste—the star ingredient! It brings both flavor and color, imparting its nutty essence throughout each bite while giving our cheesecake layer its beautiful green hue. When selecting your pistachio paste, look for one made from high-quality nuts without added sugars or oils for the best results.
- 1 cup granulated sugar – We need granulated sugar here to balance out the savory notes from the cream cheese and pistachios while also providing sweetness to enhance those rich flavors. Be sure to mix well so it dissolves completely into your cream cheese mixture—this guarantees smoothness throughout!
- 2 large eggs – Eggs are vital in this recipe as they provide structure and stability once baked. They help achieve that creamy consistency while preventing our cheesecake from collapsing under its own weight. Always remember to beat eggs lightly before adding them; this helps incorporate air which lightens up our mixture.
- 1/2 cup heavy cream – Heavy cream adds luxurious thickness and richness to our cheesecake layer, making every bite feel indulgent! It also helps create that velvety mouthfeel we crave in desserts like this one. If you’re looking for substitutes due to dietary preferences or availability issues, coconut cream could work beautifully here!
- 1 teaspoon vanilla extract – Never underestimate the power of good quality vanilla extract! It rounds out all the flavors beautifully and adds warmth to our cheesecake layer. Whether using homemade or store-bought extract, make sure it’s pure vanilla rather than imitation for authentic flavor.
- 1/2 cup finely chopped pistachios – These little gems add texture as well as visual appeal when sprinkled into our cheesecake layer! Their crunchiness contrasts beautifully with the smoothness of cream cheese while reinforcing that lovely pistachio flavor throughout.
For the Blackberry Compote:
- 1 cup fresh blackberries – Fresh blackberries bring vibrancy both visually and flavor-wise—they’re tart yet slightly sweet when cooked down into compote form! Look for plump berries without bruises or mold; they should be deeply colored and fragrant.
- 3 tablespoons sugar – Sugar balances out these tart berries by coaxing their natural sweetness forward during cooking—this transformation is utterly intoxicating! You can adjust based on how sweet or tart your blackberries are.
- 1 tablespoon lemon juice – A splash of lemon juice brightens up our compote by adding acidity which enhances flavors significantly while preventing oxidation in those beautiful blackberries!
- 1 teaspoon cornstarch mixed with 1 tablespoon water – This mixture acts as a thickening agent once added at just the right moment during cooking; it transforms our blackberry sauce into a luscious topping instead of just syrupy liquid. Be sure not to skip mixing beforehand—otherwise lumps may form!
For the Mascarpone Topping:
- 1 cup mascarpone cheese – Mascarpone adds a luxurious creaminess unparalleled by other cheeses—it’s rich but light at once! It creates an ethereal topping paired effortlessly with whipped heavy cream without being overly sweetened.
- 1/4 cup powdered sugar – Powdered sugar dissolves quickly when combined with mascarpone cheese ensuring we achieve velvety smoothness every time without graininess—a dream come true in any dessert topping!
- 1 teaspoon vanilla extract (same as above) – Just like before; quality vanilla elevates everything it touches bringing warmth throughout each spoonful of mascarpone topping draped over luscious cheesecakes below!
- 1/2 cup heavy cream (same as above) – Using heavy cream again enhances lightness while providing body needed within whipped toppings allowing us full control over texture achieved—who doesn’t love fluffy clouds of whipped goodness?
Step 1: Making The Biscuit Base
Let’s kick things off by preparing our delicious biscuit base—it’s where all great cheesecakes begin! Start by preheating your oven to 350°F (175°C), ensuring it’s nice and hot before we pop anything inside—this is crucial for achieving an even bake on those biscuits! In a medium-sized bowl, mix together your crushed digestive biscuits or graham crackers along with melted butter and sugar until fully combined—this is where things get exciting because you’ll feel how everything binds together like magic! Trust me on this step: if it’s too crumbly or dry at first glance (you know what I mean!), don’t hesitate adding another drizzle of melted butter until you reach that sandy consistency perfect enough to hold shape when pressed down into muffin tins later on.
Once everything looks seamlessly blended without any dry bits sneaking around (we want no rogue crumbs!), grab yourself some muffin tins lined with cupcake liners—their sturdiness makes them perfect partners during baking since they help keep shapes intact once cooled later on too! Press down firmly using either fingers or measuring cups until each liner feels compacted evenly across bottom surfaces—that compression will ensure sturdy bases later when assembling layers atop them post-baking! Bake these beauties for about 10 minutes until golden brown edges appear—the aroma wafting through should be utterly intoxicating by now!
Step 2: Crafting The Pistachio Cheesecake Layer
Now onto one of my favorite parts—the heavenly pistachio cheesecake layer! Begin by beating softened cream cheese using an electric mixer set at medium speed until beautifully smooth—this process known as creaming helps incorporate air which yields lighter textures overall resulting in dreamy outcomes ahead (it takes about two minutes)! Gradually add in granulated sugar next while continuing mixing until fully incorporated—you should see mixture lighten slightly during this stage too which indicates progress going well thus far!
Next up comes my secret weapon: introducing that luscious pistachio paste alongside beaten eggs one at a time—don’t rush here because patience pays off big time here folks; allow each egg enough time being fully absorbed before adding another one—it creates cohesion necessary needed within final product happening soon afterward! Finally finish off adding heavy cream followed by vanilla extract plus finely chopped nuts then mix again briefly before scraping sides down ensuring nothing was left behind (that would be tragic!). Once everything looks even throughout batter-wise—set aside briefly whilst focusing next task ahead involving making blackberry compote—we want maximum enjoyment coming from both flavors working harmoniously together when layered later on…
Step 3: Creating The Blackberry Compote
Time now for some berry magic—the blackberry compote will elevate those cheesecakes into stratospheric realms beyond comprehension trust me here folks! In medium saucepan over medium heat combine fresh blackberries along with sugar stirring occasionally until berries release juices becoming soft & delightful tasting right off fork dipped directly within pot itself (oh yes please!). After about five minutes passed during simmering phase comes addition citrusy zing found within lemon juice along cornstarch slurry previously prepared earlier alongside water—all combined thoroughly giving us glossy consistency desired when fully done swirling around pots edges feeling temptingly inviting already aren’t they?
Bring mixture back up heat level gently allowing bubbles forming around edges indicating readiness achieved then reduce flame low enough keeping simmer consistent stirring constantly until darkened thickened appearance happens taking roughly three more minutes overall until desired texture reached—you’ll know immediately upon feeling change upon spoons surface after dipping inside pot bringing forth beautiful darkened purple hues against backdrop there waiting eagerly awaiting adornment atop untouched cheesecakes chilled patiently below…
Step 4: Whipping Up The Mascarpone Topping
At last arrives grand finale moment folks—the crowning glory atop those luscious cheesecakes awaits eager attention now being crafted delicately using mascarpone cheese plus powdered sugar whisked vigorously together till fluffy clouds form enticingly alongside hinting vanilla notes emerging gracefully floating upwards invitingly beckoning everyone nearby wanting dive deep inside taste adventures waiting ahead… While doing so do ensure separate bowl available ready holding chilled heavy cream next prepared previously used earlier mixing tools still near-by handy thus avoiding unnecessary messes occurring later post-swirling needed steps ahead…
Whip chilled heavy cream separately till stiff peaks appear forming graceful dance movements revealing gorgeous textures appearing swirls intertwined beautifully connecting across surfaces forming divine delights awaiting presentation time coming soon shortly thereafter leading towards final assembly moments approaching swiftly ahead…
With all components meticulously prepared now awaits assembling order layering ingredients thoughtfully designed ensuring harmony throughout entire dish honoring true artistry delivering satisfaction expected upon serving guests alike enjoying every last morsel offered joyously sharing laughter memories created lasting impressions made forevermore…
Final Touches & Assembly
With our components now perfectly prepared—the creamy pistachio cheesecake layer resting peacefully inside its biscuit shell and our vibrant blackberry compote waiting patiently—we are ready for assembly!
Step 9: Assembling Your Towers with Love
Now comes perhaps the most exciting part: assembling your Pistachio Blackberry Cheesecake Towers! Carefully remove your chilled cheesecake from its springform pan—run a sharp knife around its edge first if needed—to ensure a clean release without losing any precious bits along the way. Place each individual slice or tower onto serving plates or a beautiful cake stand—whatever gets those taste buds tingling when they see them!
Before diving headfirst into devouring these beauties (I know how tempting they are), let’s finish with some flair by whipping up our mascarpone topping! In a medium bowl, combine half a cup of mascarpone cheese along with half a cup of powdered sugar and half a teaspoon of vanilla extract—you’ll want everything nice and fluffy so mix using either an electric mixer or whisk until light peaks form (about two minutes). Gradually drizzle in half a cup heavy cream while continuing mixing until soft peaks appear; this adds such richness without overpowering our lovely layers beneath.
Now here’s where creativity shines through: spoon generous dollops—or pipe if you’re feeling fancy—of mascarpone atop each cheesecake tower before drizzling warm blackberry compote over them like sweet ribbons cascading down their sides. Garnish with fresh blackberries scattered artfully around each plate along with chopped pistachios sprinkled generously on top alongside optional edible flowers if desired—they’ll make everything look oh-so-gorgeous!
Finally dust lightly with powdered sugar for an extra touch of elegance because who doesn’t love sparkle? And remember—take pictures first before serving because these Pistachio Blackberry Cheesecake Towers are not only delicious but also utterly Instagrammable!
As you take that first bite—a harmonious blend bursting with flavors—the creaminess mingling beautifully alongside tartness will dance upon your palate like nothing else you’ve ever tasted before; it’s truly extraordinary! I can’t wait for you all to share these delightful creations at gatherings or simply enjoy them by yourself (no judgment here!). Trust me when I say these towers are bound to become cherished memories shared amongst family and friends alike. Happy baking!
Storage and Enjoyment Tips for Your Pistachio Blackberry Cheesecake Towers
Oh, my dear friends, we have reached a moment of truth! Your Pistachio Blackberry Cheesecake Towers are ready to be devoured, but before you dive in headfirst, let’s talk about how to preserve this exquisite creation for those moments when you want to indulge later. I can’t stress enough how delightful these towers taste even days after they’ve been made—if they last that long! Trust me when I say that with the right storage techniques, you can enjoy their velvety layers and vibrant flavors for a bit longer.
Storing Leftover Pistachio Blackberry Cheesecake Towers
To keep your delightful Pistachio Blackberry Cheesecake Towers fresh, it’s essential to store them properly. Use an airtight container—this is crucial as it prevents air from drying out your cheesecake and allows those luscious flavors to stay intact. If you’re planning to store them in the fridge, they’ll maintain their quality for about 3 to 5 days. As a little pro tip, you might consider placing a slice of bread in the container; it helps retain moisture and keeps your cheesecake towers wonderfully creamy! After a few days in the fridge, you’ll find that the flavors meld together beautifully, making each bite even more profoundly satisfying than before. When you’re ready to enjoy them again, simply pull them out of the fridge and allow them to come back to room temperature; this enhances their flavor and texture.
Freezing Components for Later
Now, if you’ve got some leftovers—or if you’re just looking ahead—freezing these cheesecake towers can be a fantastic option! You can freeze individual slices wrapped tightly in plastic wrap and then placed inside a freezer-safe bag. This will keep them deliciously intact for up to 2 months. The beauty of freezing is not only in convenience but also in the fact that you can whip out a slice whenever those sweet cravings strike—imagine pulling one out on a cozy evening and letting it thaw while you brew a cup of tea! When you’re ready to serve from frozen, allow it to sit in the fridge overnight or at room temperature for about an hour before indulging. I promise you, even straight from the freezer, they’ll retain that extraordinary flavor profile that makes them so special.
Dessert
Pistachio Blackberry Cheesecake Towers
Indulge in the enchanting world of Pistachio Blackberry Cheesecake Towers, a delightful dessert that captures the essence of celebration in every layer. These towers combine the earthy richness of pistachios with the vibrant tartness of fresh blackberries, creating an unforgettable culinary experience. With a buttery biscuit base, a creamy pistachio filling, and a luscious blackberry compote, each bite transports you to a realm of flavor and nostalgia. Perfect for any occasion, these cheesecake towers are not just desserts; they are memories waiting to be made and shared with loved ones.
- Prep Time: 30 minutes
- Cook Time: 55 minutes
- Total Time: 1 hour 25 minutes
- Yield: Approximately 12 servings 1x
- Category: Dessert
- Method: Baking
- Cuisine: American
Ingredients
- 1 cup digestive biscuits or graham crackers, crushed
- 6 tablespoons unsalted butter, melted
- 16 oz cream cheese, softened
- 1 cup pistachio paste
- 1 cup granulated sugar
- 2 large eggs
- 1/2 cup heavy cream
- 1 teaspoon vanilla extract
- 1 cup fresh blackberries
- 3 tablespoons sugar (for compote)
- 1 tablespoon lemon juice
- 1 cup mascarpone cheese
Instructions
- Preheat oven to 350°F (175°C). Mix crushed biscuits with melted butter and sugar until combined. Press into muffin tins and bake for 10 minutes until golden.
- In a bowl, beat softened cream cheese until smooth. Add pistachio paste and mix well. Gradually add sugar, then eggs one at a time. Incorporate heavy cream and vanilla extract.
- Pour the cheesecake mixture over the baked biscuit base and bake at 325°F (160°C) for 40-45 minutes until set but slightly jiggly in the center. Cool at room temperature for an hour before refrigerating for at least four hours.
- For the compote, simmer blackberries with sugar and lemon juice until soft. Thicken with cornstarch mixed with water.
- Whip mascarpone cheese with powdered sugar and vanilla extract until fluffy. Assemble by layering cheesecake with compote and mascarpone topping.
Nutrition
- Serving Size: 1 slice (90g)
- Calories: 320
- Sugar: 23g
- Sodium: 150mg
- Fat: 22g
- Saturated Fat: 10g
- Unsaturated Fat: 11g
- Trans Fat: 0g
- Carbohydrates: 27g
- Fiber: 2g
- Protein: 5g
- Cholesterol: 75mg
Leave a Comment