

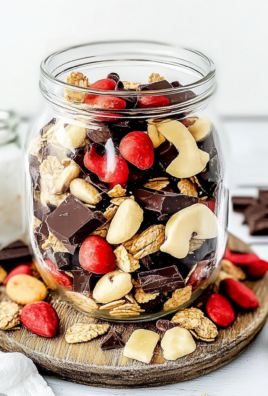
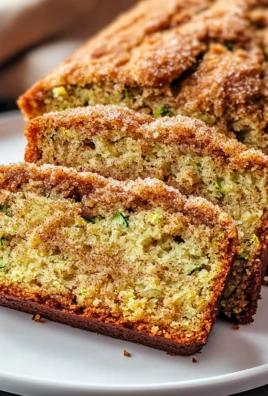
Imagine biting into a chewy, sweet, and slightly nutty homemade cereal bar that’s chock-full of delicious things like oats, honey, and chocolate. These homemade cereal bars aren’t just any snacks; they are the edible hug that we all need in our busy lives. They carry a delightful balance of textures, from chewy dried fruits to crunchy nuts, making them the perfect pick-me-up whenever your energy dips.
Now, picture this: it’s a lazy Sunday morning, and the kids are bouncing off the walls, ready for adventure. You sneak into the kitchen, pulling out your trusty mixing bowl and those wholesome ingredients. Before you know it, you’ll be whipping up these scrumptious homemade cereal bars, a treat that not only satisfies those little rumbles but also brings a sense of accomplishment when they gobble them right up. Perfect for lunchboxes, road trips, or simply as a delightful snack, these bars are a game changer!
Why You'll Love This Homemade Cereal Bars
- This incredible Homemade Cereal Bars transforms simple everyday ingredients into restaurant-quality flavors that will blow your mind completely.
- Foolproof recipe techniques guarantee perfect results every single time, making even novice cooks feel like professional chefs instantly.
- Stunning visual appeal with gorgeous colors and mouthwatering aromas creates the ultimate Instagram-worthy dish for any special occasion.
- Endlessly adaptable for different dietary needs while working beautifully for meal prep, date nights, or entertaining large groups effortlessly.
Ingredients for Homemade Cereal Bars
Here’s what you’ll need to make this delicious Homemade Cereal Bars:
2 cups rolled oats – The backbone of your bars, providing texture and hearty goodness. Use gluten-free oats if needed.
1 cup nut butter (e.g., almond or peanut) – This creamy base adds richness and helps bind the bars together. Feel free to swap with sunflower seed butter for a nut-free option.
½ cup honey – Nature’s sweetener that not only adds sweetness but also helps to hold your ingredients together.
1 cup dried fruits (e.g., cranberries, apricots) – Perfect for adding chewiness and bursts of flavor. Choose your favorites or whatever you have on hand.
½ cup chopped nuts (e.g., walnuts, almonds) – For that extra crunch. Choose roasted nuts for extra flavor or toasted for a delicious twist.
¼ cup dark chocolate chips (optional) – Because who doesn’t love a little chocolate? These can elevate your bars to a whole new level of deliciousness!
How to Make Homemade Cereal Bars
Follow these simple steps to prepare this delicious Homemade Cereal Bars:
Step 1: Prepare Your Workspace
First things first, clear off your kitchen counter and gather all your ingredients. Line an 8×8-inch baking dish with parchment paper; this will make it easy to lift the bars out once they are set.
Step 2: Melt the Nut Butter and Honey
In a microwave-safe bowl, combine your nut butter and honey. Microwave for about 30 seconds or until smoothly melted, giving it a gentle stir halfway through to keep things blissfully combined.
Step 3: Mix the Dry Ingredients
In a separate bowl, mix together the rolled oats, chopped nuts, and dried fruits. It’s time to make a nutritious party of these beautifully wholesome ingredients.
Step 4: Bring It All Together
Carefully pour the melted nut butter-honey mixture over your oat mixture. Stir it together until everything is evenly coated and swings together like a well-rehearsed dance line.
Step 5: Transfer and Compact
Spoon the mixture into the prepared baking dish. Use a spatula or your hands (lightly greased, if you prefer) to press down firmly. Make sure to compact it well—a firm bar is a happy bar.
Step 6: Chill and Slice
Place your pan in the refrigerator and let it chill for about 30 minutes. Once set, lift it out using the parchment paper and cut it into bars. Voilà, your homemade cereal bars are ready to be enjoyed!
These homemade cereal bars make for a versatile snack—perfect for fueling your morning run, providing a healthy afternoon pick-me-up, or satisfying that late-night sweet tooth! You can even pack them for your next picnic or long road trip to keep the hunger monsters at bay. So, gather your loved ones, whip up a batch, and enjoy the delightful joy that comes with homemade goodness!

Perfect Results, Every Single Time! 🌡️
Never serve dry or undercooked food again. The Chef-X Digital Probe gives you an accurate temperature reading in under 3 seconds. It's the secret tool I use for perfect steaks, juicy chicken, and safe milk temperatures.

You Must Know About Homemade Cereal Bars
- This showstopping Homemade Cereal Bars delivers restaurant-quality results using simple ingredients you probably already have at home.
- The perfect balance of textures and flavors creates an unforgettable dining experience that will have everyone asking for seconds.
- Picture-perfect presentation with vibrant colors makes this dish absolutely Instagram-worthy and guaranteed to impress any dinner guest.
- Incredibly versatile recipe that works beautifully for weeknight dinners, meal prep, special occasions, or even outdoor entertaining sessions.
Perfecting Homemade Cereal Bars Cooking Process
To create the perfect Homemade Cereal Bars, start by melting the nut butter and honey until smooth. While it cools, mix your dry ingredients for an efficient assembly of textures and flavors in one glorious, chewy bite.
Add Your Touch to Homemade Cereal Bars
Feel free to customize your Homemade Cereal Bars by swapping out the nut butter for sun butter or adding seeds like chia or pumpkin. Get creative with dried fruits and nuts, or even stir in some protein powder for an extra boost.
Storing & Reheating Homemade Cereal Bars
Store your Homemade Cereal Bars in an airtight container in the fridge, where they’ll last up to a week. For an on-the-go treat, cut them into bars, individually wrap, and freeze. No need to reheat—enjoy straight from the fridge!
Chef's Helpful Tips for Homemade Cereal Bars
- This professional-quality Homemade Cereal Bars relies on precise timing and temperature control to achieve restaurant-standard results consistently.
- Master the art of mise en place by prepping all ingredients beforehand, ensuring smooth execution and preventing any last-minute cooking disasters.
- The secret lies in layering flavors throughout the cooking process rather than seasoning only at the end for maximum depth.
- Pro tip: let the finished dish rest for optimal texture and flavor development before serving to hungry guests waiting eagerly.
I remember the first time I made these Homemade Cereal Bars. I was scrambling to find a healthy snack for a school bake sale, and my friends ended up devouring them all, begging for the recipe!
FAQs About Homemade Cereal Bars
What are Homemade Cereal Bars?
Homemade Cereal Bars are deliciously chewy snacks made from rolled oats, nut butter, honey, and a variety of mix-ins like dried fruits and nuts. They’re a great alternative to store-bought bars, packed with wholesome ingredients and free from preservatives. These bars are incredibly easy to whip up without any baking required, making them perfect for a quick grab-and-go breakfast or a healthy snack. You can customize flavors to suit your taste, allowing everyone to enjoy a personalized treat.
Can I customize my Homemade Cereal Bars?
Absolutely! One of the best things about Homemade Cereal Bars is their versatility. Feel free to swap the nut butter for alternatives like sun butter or tahini for nut-free options. You can also adjust your mix-ins based on your preferences by using different dried fruits, seeds, or even protein powder. Want a chocolate twist? Add dark chocolate chips or cocoa powder. The possibilities are endless, so get inventive!
How should I store Homemade Cereal Bars?
To keep your Homemade Cereal Bars fresh, store them in an airtight container in the refrigerator. They will stay good for up to a week. For longer storage, cut them into individual bars, wrap them, and freeze them. Whenever you need a snack, simply grab one from the freezer—no need to thaw! Just enjoy them straight from the fridge for a refreshing treat.
How do I know when my Homemade Cereal Bars are ready?
Your Homemade Cereal Bars are ready when they have set up firm to the touch after chilling in the refrigerator. Typically, you should give them about 30 minutes to an hour to firm up. When cutting into bars, ensure that they are firm enough to hold their shape yet chewy enough to provide that satisfying bite. If your mixture feels too loose before chilling, consider pressing it down more firmly into the baking dish.
Conclusion for Homemade Cereal Bars
In summary, Homemade Cereal Bars are an excellent way to stay healthy while satisfying that snack craving. With simple ingredients and minimal preparation time, you can create delicious, nutritious bars tailored to your preferences. Whether you are preparing for a busy week or need a quick treat, these bars are sure to please. Don’t forget to experiment with flavors, and you’ll be delighted with every scrumptious bite of your Homemade Cereal Bars. Enjoy!

Delicious Homemade Cereal Bars: Easy No-Bake Recipe for Snacks
Ingredients
Equipment
Method
- Prepare your workspace by gathering all ingredients and lining an 8x8-inch baking dish with parchment paper.
- In a microwave-safe bowl, melt the nut butter and honey together until smooth, about 30 seconds.
- In another bowl, mix the rolled oats, chopped nuts, and dried fruits until well combined.
- Pour the melted nut butter-honey mixture over the dry ingredients and stir until everything is evenly coated.
- Transfer the mixture to the prepared baking dish and press down firmly to compact it.
- Chill in the refrigerator for about 30 minutes before slicing into bars.

Leave a Comment