

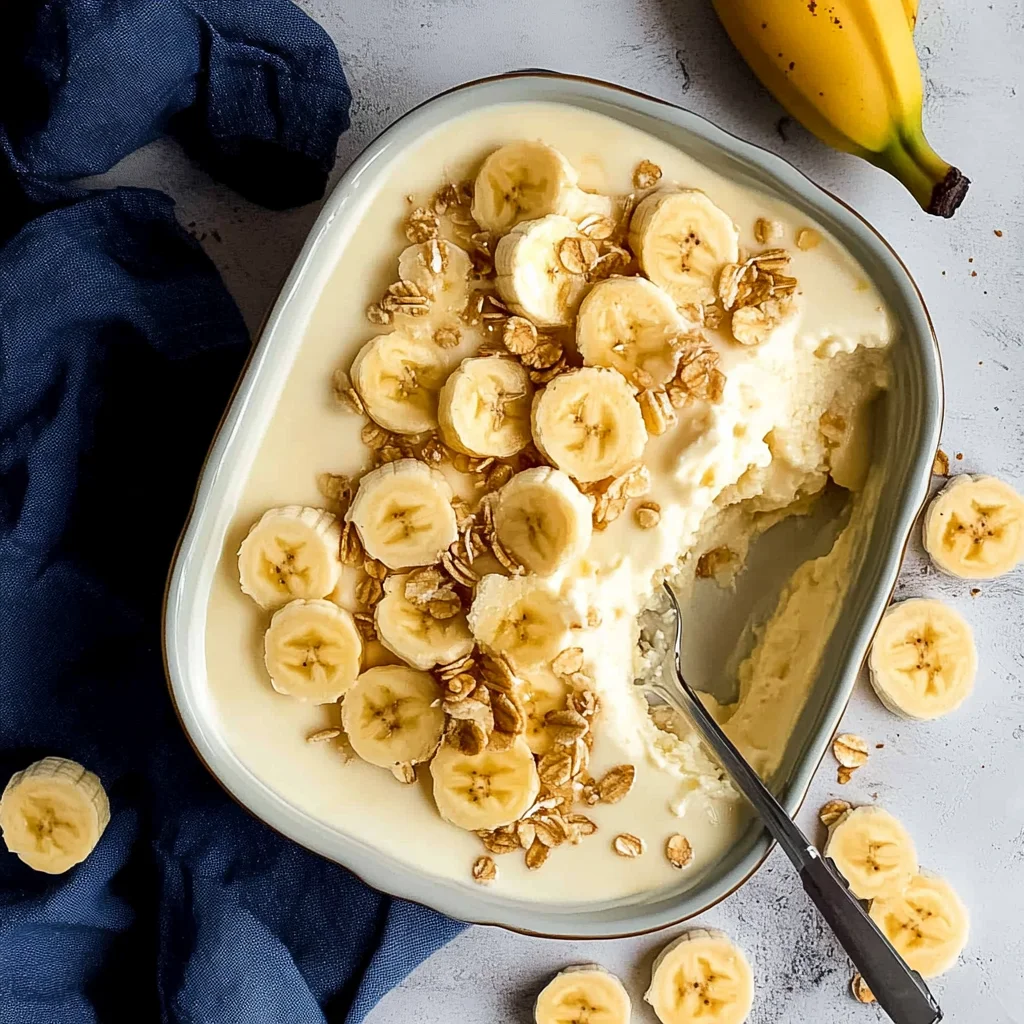
Indulging in a bowl of No Bake Banana Pudding is like wrapping yourself in a warm, creamy embrace. The luscious layers of velvety vanilla pudding, fresh banana slices, and fluffy whipped cream create a delightful contrast of textures that beckons you to take another bite. This dessert not only satisfies your sweet tooth but also evokes a sense of nostalgia, making it the perfect comfort food to share with loved ones during cozy gatherings or special occasions.
What sets this No Bake Banana Pudding apart is its effortless preparation, allowing you to whip up an impressive treat without turning on the oven. The use of ripe bananas adds a natural sweetness that harmonizes beautifully with the rich pudding, while a sprinkle of crushed vanilla wafers provides just the right amount of crunch. Serve it chilled in elegant glasses for a touch of sophistication, inviting everyone to savor each delectable layer and enjoy the comforting flavors that make this dessert truly unforgettable.
Why You’ll Love This No Bake Banana Pudding
You’ll adore this No Bake Banana Pudding for its incredible creaminess and delightful layers that create a symphony of flavors and textures. The rich pudding, made with whole milk and whipped heavy cream, delivers a luscious mouthfeel that beautifully complements the soft slices of ripe bananas nestled between crunchy vanilla wafers. Each bite offers a satisfying contrast, where the smoothness of the pudding meets the gentle chew of the bananas, all while being infused with a hint of vanilla that elevates the entire experience. Plus, this dessert comes together in no time, making it the perfect choice for an effortless yet impressive treat that will have everyone asking for seconds—so why not whip it up tonight?
What Kind of Milk Should I Use?
For this No Bake Banana Pudding, whole milk is the best choice to achieve a rich and creamy texture in your pudding layer. Whole milk has a higher fat content compared to 2% milk, which enhances the mouthfeel and flavor of the pudding, making it luxuriously smooth. If you prefer using 2% milk, you can certainly do so, but be prepared for a slightly lighter consistency; consider adding a bit more heavy cream to compensate for the reduced richness. Whichever option you choose, the key is to ensure that your milk is cold when mixing with the pudding mix for optimal thickening and creaminess.
What You’ll Need for No Bake Banana Pudding
Each ingredient in this dish plays an essential role in flavor and texture. Here’s what you’ll need:
2 cups milk (whole or 2% milk): Provides the creamy base for the pudding layer.
1 package instant vanilla pudding mix (3.4 oz): Delivers sweetness and structure to create a luscious pudding.
1 cup heavy cream (whipped to soft peaks): Adds a light, airy texture that makes the dessert indulgent and fluffy.
1 teaspoon vanilla extract: Enhances the overall flavor with rich, aromatic notes.
3 medium ripe bananas (sliced): Contributes natural sweetness and a soft, fruity layer in every bite.
1 box vanilla wafers (about 12-15 wafers per layer): Offers a delightful crunch that contrasts beautifully with the creamy layers.
How To Make This Recipe

Perfect Results, Every Single Time! 🌡️
Never serve dry or undercooked food again. The Chef-X Digital Probe gives you an accurate temperature reading in under 3 seconds. It's the secret tool I use for perfect steaks, juicy chicken, and safe milk temperatures.

Whisk the Pudding
In a mixing bowl, combine 2 cups of whole or 2% milk with 1 package of instant vanilla pudding mix. Whisk these ingredients together vigorously for about 2 minutes until the mixture becomes smooth and thickened, resembling a custard-like consistency. This step is crucial as it ensures the pudding sets properly later.
Fold in the Cream
Once the pudding is thickened, gently fold in 1 cup of heavy cream that has been whipped to soft peaks along with 1 teaspoon of vanilla extract. Use a spatula to incorporate the whipped cream without deflating it too much, ensuring the mixture remains light and airy for a creamy texture in your dessert.
Layer the Wafers
Take a 9×9 inch baking dish and start by placing a layer of vanilla wafers at the bottom. Arrange about 12-15 wafers evenly so they cover the base completely. This will create a sturdy foundation for your No Bake Banana Pudding.
Add the Bananas
Next, layer on 3 medium ripe bananas that have been sliced. Distribute them evenly over the vanilla wafers, allowing their sweetness to complement the creamy pudding. The bananas should cover most of the wafers for optimal flavor in every bite.
Spread Half of the Pudding
Now, spread half of your prepared pudding mixture over the sliced bananas. Use a spatula to ensure an even layer that fully covers the bananas, creating a delightful contrast between textures. This step not only adds creaminess but also helps bind all layers together.
Repeat the Layers
Repeat the layering process with another round of vanilla wafers, followed by banana slices and then finish with the remaining pudding mixture on top. Make sure each layer is evenly distributed and that you use all components for a satisfying finish to your dessert.
Chill to Set
Cover your assembled dish tightly with plastic wrap and place it in the refrigerator for at least 2 hours. This chilling time allows the layers to set properly and meld together, resulting in a cohesive dessert that’s easy to serve.
Serve and Garnish
When ready to enjoy, serve your No Bake Banana Pudding chilled straight from the fridge. If desired, garnish each serving with additional whipped cream and banana slices for an appealing presentation that enhances both flavor and texture.
How to Serve and Store No Bake Banana Pudding
This No Bake Banana Pudding recipe makes four generous servings, perfect for sharing with family or friends. For an inviting presentation, layer the pudding in individual clear cups to showcase the beautiful banana slices and whipped cream, or serve it in a large glass dish for a classic look. Pair it with a sprinkle of crushed vanilla wafers on top for added crunch, or enjoy it alongside a dollop of extra whipped cream for that extra indulgence.
To store any leftovers, transfer the pudding into an airtight container and keep it in the refrigerator for up to three days. When you’re ready to enjoy it again, simply give it a gentle stir to restore its creamy texture; if you find it a bit thick, add a splash of milk to loosen it up. While this dessert is best enjoyed fresh, it doesn’t freeze well due to the bananas and pudding separating, which can affect the overall texture.
Garlic Butter Noodles
Rich and savory garlic butter noodles create a delightful contrast to the sweet creaminess of the banana pudding, enhancing your dessert experience.
Roasted Brussels Sprouts
The caramelization of roasted Brussels sprouts offers a crunchy texture and earthy flavor that beautifully balances the softness of the pudding.
Vanilla Bean Scones
Buttery and subtly sweet vanilla bean scones echo the flavors of your dessert while providing a delightful crumbly texture to savor.
Spinach Strawberry Salad
A fresh spinach salad with juicy strawberries and a light vinaigrette introduces brightness and acidity that cuts through the richness of the banana pudding.
Creamy Mashed Sweet Potatoes
Sweet and creamy mashed sweet potatoes provide a comforting, velvety counterpart that complements the sweetness of the bananas perfectly.
Biscuit Bites
Flaky biscuit bites, either sweet or savory, serve as a delightful vehicle for enjoying every layer of the no-bake banana pudding.
Can I use almond milk instead of regular milk? Yes, you can use almond milk as a substitute for regular milk in this recipe. Just keep in mind that it may slightly alter the flavor and texture of the pudding layer, but it should still work well.
Is there a way to make this dessert gluten-free? Absolutely! To make No Bake Banana Pudding gluten-free, simply use gluten-free vanilla wafers instead of regular ones. This will ensure that you maintain the delicious layers while accommodating gluten sensitivities.
Can I prepare this banana pudding ahead of time? Yes, you can easily make this dessert a day in advance. Just assemble the layers and refrigerate as directed; it actually tastes better after chilling overnight as the flavors meld together.
How do I know when the pudding layer is ready? The pudding layer is ready when it thickens after whisking the instant pudding mix with milk for about 2 minutes. It should be smooth and have a creamy consistency before you fold in the whipped cream.
Can I add other fruits to this recipe? Yes, feel free to get creative by adding other fruits such as strawberries or blueberries between the layers. They can complement the bananas nicely and add extra flavor to your dessert.
Final Thoughts
There’s something truly special about No Bake Banana Pudding that makes it a delightful addition to any gathering—its creamy layers and delightful flavors will surely impress your guests while being effortlessly easy to prepare. If you loved this dessert, be sure to check out [Chocolate Eclair Cake] and [Strawberry Shortcake Trifle] for more sweet treats that are just as simple and satisfying. We’d love for you to share your creations with us on Pinterest and let us know how your No Bake Banana Pudding turned out in the comments!
No Bake Banana Pudding
Ingredients
Method
- In a mixing bowl, whisk together the milk and instant vanilla pudding mix until smooth and thickened, about 2 minutes.
- Gently fold in the whipped cream and vanilla extract until combined.
- In a 9x9 inch baking dish, place a layer of vanilla wafers at the bottom.
- Add a layer of sliced bananas on top of the wafers.
- Spread half of the pudding mixture over the bananas.
- Repeat the layers with remaining wafers, bananas, and pudding mixture.
- Cover the dish with plastic wrap and refrigerate for at least 2 hours to set.
- Serve chilled, garnished with additional whipped cream and banana slices if desired.
Leave a Comment